
I am slowly getting this t-shirt quilt done. I quilted the top, batting, and backing together. I like to stitch in the ditch between the shirts and the sashing. Personally I don’t like seeing stitching on the shirts. 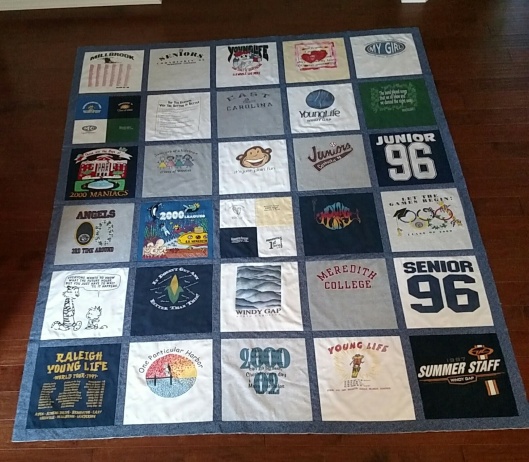
The next step is to make the binding. I measured the quilt and it is approximately 84″ x 100″. When I find the perimeter for the quilt I need about 368″ of bias binding. You always want more than this amount based on the corners and joining the two ends together.
To make the binding:
- Lay your fabric on your table, and fold the cut side down to the selvage giving you a 45 degree angle.
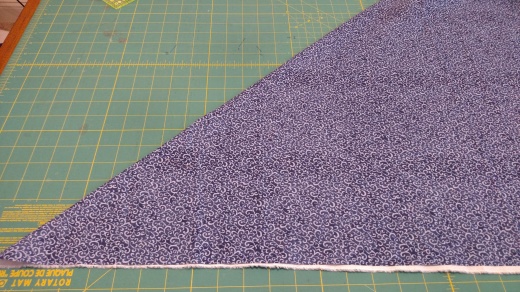
- Press this angle using your fingers or an iron.
- Open the fabric up and you will see your pressed line. Cut along this line.
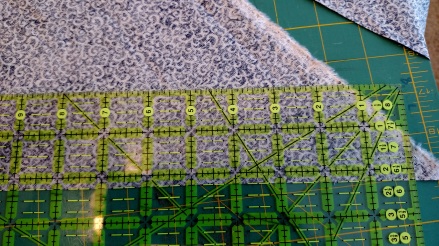
- Now cut 2.25″ strips along this same line. I cut 8 strips for this quilt.
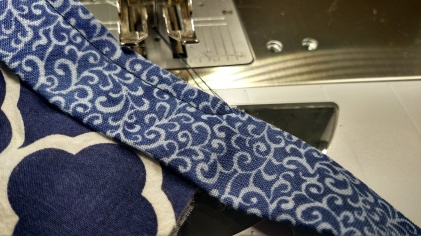
- Now you want to join the strips together. Take two of your strips. Lay one down on your ironing board horizontally. Lay the second strip right sides together vertically on top of that strip. Fold the top strip down at a 45 degree angle and press. Pin these strips together being careful to not move the fabric.


- Sew along this diagonal line. Cut the excess fabric off. I eyeball about 1/4″. Press the fabric outwards. Keep repeating until all the strips are sewn together.

- Now that you have one long bias strip, you want to press it. Fold it over on top of itself bringing the cut side over to the other cut side. Iron the whole strip of fabric. I like to put the whole strip of fabric on a piece of cardboard to make it easier to deal with when sewing it to your quilt.


Sewing your binding to your quilt:
- Start at the bottom middle of your quilt. Leave a long tail of binding so that it is easy to sew the two ends together. I like to put pins 1/4″ away from each of the corners so that I know where to stop.


- Sew all the way to that pin and then turn it 45 degrees and sew off the quilt.
- You then want to move the quilt away from the needle. Fold the binding at a 45 degree angle and then fold it back down so that the selvage edges are touching. (Sorry I didn’t take enough pictures so I am using my floor as my quilt… You can see in the first picture how I fold it up at an angle and in the second picture how I then fold the fabric back down along that line, my pretend quilt edge.)


- Now start sewing again 1/4″ from the top of the quilt. You can eyeball where the line is from where you just sewed your binding on. Continue sewing until you get back to the bottom of the quilt. Leave a good amount left undone so it is easier to sew both pieces together.
- Lay the two ends of binding on top of the quilt straight across the bottom. Overlap the two pieces and use a pin to mark where the top piece is 2.25″ longer than the first piece. Cut along this line.

- Now you want to take your top piece open it up, and lay it on top of the bottom vertically piece right sides together. I then folded it at a 45 degree angle and finger pressed this line. Sew up this line and your binding will be all together.


- You can now sew the rest of the binding to the quilt!
- Once you are done, flip the quilt over and start sewing the binding to the front. I go slowly and just turn the binding over to the top of the quilt. Because of how you did the corners it makes the corners on the front easy! Just pull the back binding to the front all the way to the bottom and then fold the next side up and it will be a perfect angle!https://wordpress.com/post/joyfullysewnendeavors.wordpress.com/506
Here is my finished quilt!!!!

Here are some binding links that I found helpful, and this is how I learned…
- https://wasntquiltinaday.wordpress.com/2013/10/16/quilting-101-machine-binding/
- http://www.redpepperquilts.com/2009/11/binding-tutorial.html
- http://mysweetprairie.blogspot.com/2011/01/tips-on-tuesdays-binding.html
Let me know if you have any questions! Happy Sewing!!!!
